Thursday, November 30, 2017

10-year-old kills herself after alleged bullying incident caught on camera

Please enable Javascript to watch this video

AURORA, Colo. -- A mother and father in Colorado say their 10-year-old daughter took her own life because of a video of a fight with an alleged bully.

Ashawnty Davis, was only in fifth grade. She was a happy girl until everything changed at the end of October when she was involved in a fight after school, her parents told KDVR.

They say it was her first fight and it was recorded by another student and posted on an app called Musical.ly.

The video shows Ashawnty and another student fighting, while other kids watched. Ashawnty's mother, Latoshia Harris,  says her daughter had been confronting the girl who had been bullying her.

"I saw my daughter was scared," she said.

The video is difficult to watch. But Ashawnty's parents are sharing it to help other parents.

"She was devastated when she found out that it had made it to Musical.ly," said her father, Anthony Davis.

"My daughter came home two weeks later and hanged herself in the closet," said Harris.

She was on life support for two weeks after passing away Wednesday.

Her parents say she was the victim of "bullycide." The term is used when someone takes his or her own life because of bullying.

"We have to stop it, and we have to stop it within our kids," said Davis.

"I want other parents to know it's happening," Harris said. "That was my baby, and I love my baby, and I just want mothers to listen."

The school district issued the following statement regarding the incident:

"This is a heartbreaking loss for the school community. Mental health supports will be made available for any students who need help processing the loss.

We do not tolerate bullying of any kind in our schools and we have a comprehensive bullying prevention program in place at all of our schools. The safety and wellbeing of students is our highest priority and we strive every today to ensure schools are safe, welcoming and supportive places that support learning.

We were made aware of that video when a media outlet approached us with it. We took immediate action in response, turning the video over to police and addressing the matter with students.

It should also be noted that the video did not take place during school hours."


Source: 10-year-old kills herself after alleged bullying incident caught on camera

Wednesday, November 29, 2017

Snapchat's redesigned app is here and much easier to use

Snapchat still looks mostly the same, but there are a few big changes that should make using it a lot easier.

As popular as Snapchat has become over the years, its app has been in need of a redesign for quite some time. Everything within the app technically works but trying to navigate it has always been something of a pain. That is, until now.

Snapchat's CEO hinted at a redesign of the application at the beginning of November, and today that redesign has officially been announced. Upon opening the new Snapchat app, you'll be met with the familiar screen of your camera's viewfinder. However, the pages to the left and right of it have received a major overhaul.

The page to the left of your viewfinder previously showcased direct messages with your friends in the last order that you talked with them, but Snapchat is now turning this into "the dynamic Friends page." You'll still be able to access direct messages to your friends here, but this is also where you'll now watch their public Stories.

Also, rather than displaying your friends in chronological order based on when you last talked to them, Snapchat is using its new "Best Friends algorithm." Snapchat says the algorithm will display your friends in the order that it thinks you want to talk to them, and the more you use the app, the more accurate it'll be in determining which friends should be placed at the top of your list.

As for the page to the right of the viewfinder, this is being dubbed as the "Discover" page. Since your friends' Stories are now on the new Friends page, Discover is where you'll find all of the content from creators, publishers, and other people in the Snapchat community that you're interested in. Just like the Friends page, content showcased on Discover will change and adapt over time based on your interests and what you like to watch the most.

The new Snapchat UI should be rolling out soon, and if you get confused, just remember – friends on the left, everything else on the right.

Snapchat on Android: Everything you need to know


Source: Snapchat's redesigned app is here and much easier to use

Tuesday, November 28, 2017

How To Choose The Best Travel Camera (Plus Win A Free GoPro!)

Best Travel Camera Guide

How to Choose a Travel Camera

Travel Photography

After 7 years as a professional travel photographer & blogger, I keep getting asked what's the best travel camera. There are so many to choose from! Here's what I would pick, and why.

If you're into photography, traveling the world with a good camera can help you bring back images that will stand the test of time — memories to share with family and friends for years to come.

Amazing travel photos are some of my most treasured souvenirs!

But what's the best travel camera for capturing these special moments on your journey? There's no easy answer to this question. Different people will have different requirements and budgets.

My goal with this digital camera buyers guide is to help you narrow down the overwhelming choices that are out there — and pick the perfect travel camera for your next trip.

Travel Photos from Norway

Norway's Lofoten Islands

Travel Camera Features
  • Size & Weight: Gone are the days when a bigger camera means a better camera. If you want to travel with your camera, you'll want something small & lightweight.
  • Manual Settings: Photography professionals want the ability to fully control the settings of their camera so they can dial in the perfect shot in all kinds of different situations.
  • Megapixels: Many people assume that more megapixels is better. This isn't always true if the pixels themselves are small. However more megapixels on a large sensor will give you higher detail, and allow you to "crop" your image without reducing quality.
  • Fast Lens: Lens aperture is measured in f/numbers, like f/1.4, f/2.8, f/4, etc. The lower the number, the better it will perform in low-light situations.
  • Zoom Range: A zoom lens lets you get closer to the action, especially for wildlife or people. But the bigger the zoom the bulkier a camera gets. How much zoom you want is a personal preference.
  • HD/4K Video: Most quality travel cameras will shoot video in HD 1080p. Some even have 4K capabilities — which honestly most people won't need unless you're doing professional work.
  • WiFi/Bluetooth Enabled: Some cameras have their own wifi network, allowing you to upload your photos instantly to your computer or smartphone.
  • Interchangeable Lenses: High-end mirrorless and DSLR cameras have interchangeable lenses, allowing you to pick the perfect lens for different situations.
  • Weatherproofing: Will your travel camera hold up against the elements? Some cameras are better protected from moisture and dust than others.
  • Travel Camera Sensor Size

    Understanding Camera Sensors

    Camera Sensor Size

    When choosing the perfect camera for traveling, you need to understand different camera sensors, and how they affect image quality and camera size.

    In general, a camera with a large sensor is going to perform better in low light because that large sensor can capture more of it.

    With a large sensor you'll also get more detail, allowing you to print your images large, or crop them smaller, and not loose any quality.

    However a large camera sensor means the camera itself will be larger as well.

    Travel Photos from Hawaii

    Ridge Hiking in Hawaii

    What Do You Want To Capture?

    When choosing the best travel camera for your needs, you must define what those needs are. Different cameras have strengths and weaknesses depending on what you're using them for.

    Are you looking for portability? Weatherproofing & ruggedness? Professional high-end image quality? Something reasonably priced? Are you going to be shooting more landscapes, wildlife, adventure activities, or people?

    You often can't have it all when it comes to travel cameras.

    Keep reading below to learn the pros & cons for each type of camera, and which types of travel photography they work best for.

    Point & Shoot Cameras

    Point & shoot cameras have come a long way. As technology has improved, companies have managed to pack these pocket-sized cameras with tons of features. Some shoot 4k video and have manual settings, just like the more expensive ones in this list.

    The big difference is the camera sensor is a bit smaller, and they don't have interchangeable lenses.

    In my opinion, a mid-range to high-end point & shoot is the best option for 75% of amature travel photographers. They combine the perfect mix of portability, power, and budget-friendliness.

    Sony RX100 Series ($700 – $1000) Sony RX100 Travel Camera

    Sony RX100 V

    The Sony RX100 V is my favorite point & shoot travel camera. It's what I'd call a "professional" point & shoot. While it fits in my pocket, it has many of the same features as my larger primary mirrorless camera.

    It's a bit pricey at $1000, but you can also pick up older models like the RX100 III ($700) and RX100 IV ($850) for less. They also make reasonably priced underwater dive-housings for this line.

    Canon PowerShot G7 X ($650) Canon G7X II Travel Camera

    Canon G7X II

    The Canon G7 X is another fantastic point & shoot that's great for travel photography. A bit less expensive than the Sony, it has fewer high-end features, but shoots great video with better on-board audio than the Sony. It's a favorite for many YouTubers and Vloggers.

    Travel Photos from a GoPro

    Best Action Travel Cameras

    Action Cameras

    Action cameras have really transformed the travel photography & video world over the years. These tiny, waterproof, indestructible cameras can go anywhere & record anything!

    If you plan on hiking, mountain biking, surfing, kayaking, snorkeling, scuba diving, or even swimming under waterfalls during your travels, an action camera can create epic video & photos of the experience.

    GoPro Hero 6 ($500) GoPro Hero 6 Travel Camera

    GoPro Hero 6

    The GoPro Hero 6 is GoPro's best camera yet, with improved video stabilization, color, and 60p slow-motion 4k footage. It's waterproof case and touch-screen will handle any adventures you dream up. A must-have for adventure addicts like me!

    GoPro Hero Session ($200) GoPro Session Travel Camera

    GoPro Session

    The GoPro Session is GoPro's smaller & cheaper model. Without a screen, this tiny cube can fit just about anywhere — you'll barely notice it. If you aren't an action sports junkie, this will do for most people. Connect to the GoPro App on your smartphone to frame your shots.

    Travel Photos from Hawaii

    Best Mirrorless Travel Cameras

    Mirrorless Cameras

    Larger than a point & shoot, but smaller than a DSLR, mirrorless digital cameras are all the rage right now. Even professional photographers are starting to switch over due to their small size and ability to produce high-quality images.

    I use a mirrorless camera as my main travel camera. They offer more features than a point & shoot, like the ability to use interchangeable lenses, and a larger sensor with better low-light capability and detail.

    Sony A7 Series ($1300 – $3200) Sony A7 Travel Camera

    Sony A7ii

    The Sony A7 II is one of the best travel cameras money can buy. Sony is on the cutting edge of camera technology lately, and other brands are having trouble keeping up. There are a few different models available.

    The Sony A7S II is geared towards videographers, with extremely good low-light capabilities. The Sony A7R III is geared for professional photographers who want super-fast focusing and a giant full-frame sensor.

    One big downside to the A7 line is the lack of a full swivel screen for vlogging.

    Fujifilm X‑T2 ($1500) Fujifilm X‑T2 Travel Camera

    Fujifilm X‑T2

    Sony A6500 ($1200) Sony A6500 Travel Camera

    Sony A6500

    The Sony A6500 is an even smaller version of Sony's awesome A7 mirrorless camera. The big difference is a slightly smaller APS-C cropped sensor, and less weatherproofing to protect against rain.

    The A6500 also shoots 4k video, shoots faster photos than the A7, and has a touch-screen. For a more budget friendly version, the older Sony A6000 is almost just as capable, for almost $700 hundred dollars less!

    DSLR Cameras

    Digital SLR Cameras (DSLR) wouldn't be my first choice for a travel camera. Because these cameras use a physical mirror instead of an electronic viewfinder, the body is larger than on a mirrorless camera.

    Personally I think most people would be better off with a mirrorless camera system these days. Especially if you're trying to minimize the weight and size of your travel gear.

    Nikon D3400 ($400) Nikon D3400 Travel Camera

    Nikon D3400

    Canon 80D ($1000) Canon 80D Travel Camera

    Canon 80D

    Using Your Smartphone

    Can you use your smartphone for travel photography? Of course you can! You'll sacrifice a bit of quality due to the super small camera sensor in phones, but if you're only publishing to the web, most people won't notice.

    Another downside is lack of a physical zoom feature (digital zooming doesn't produce great results).

    Some smartphones can even shoot in RAW format these days though. I travel with an iPhone 7+, but the Galaxy S8 and Google Pixel 2 also take amazing photos & video. Smartphones are also great backup cameras too.

    What About Camera Lenses?

    You honestly don't need a million different camera lenses. When I first started, I only used a single general-purpose lens while I was learning.

    If you have money to burn, then get two: a wide angle zoom and a telephoto zoom.

    These two lenses will allow you to capture a mix of landscapes, portraits, and wildlife from a distance. However lugging around multiple lenses and changing them back & forth can be annoying if you're new to photography.

    To keep things easy, I'd recommend only one lens at first. Something with a decent focal range, around 18mm – 55mm or 28mm – 70mm.

    When looking at a lens aperture, the lower the number, the better it will be in low light. F2.8 or F4 should cover you for most situations. If you want to shoot star photography, go with F2.8 or lower.

    Hawaii from the Air

    Flying my DJI Mavic Over Hawaii

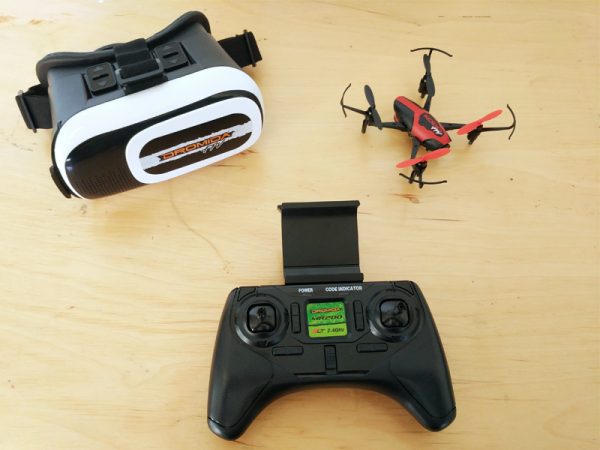
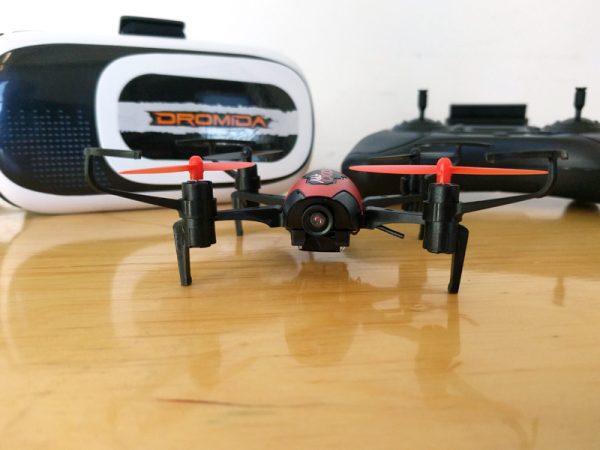
    Drones For Travel Photography

    Drones are incredible tools for capturing images & video in a totally different perspective. But this probably isn't the most important travel camera for the average person.

    Many places have restrictions on flying personal drones, for example US National Parks, and even entire countries. So you need to do your research to avoid heavy fines or confiscation.

    If you REALLY want a drone, I'd recommend the DJI Spark for beginners. It's tiny, pretty affordable, and very easy to use.

    If you eventually want to make money from your drone photography, and have a larger budget, than you'll completely fall in love with the more professional DJI Mavic Pro. You can see my review video here.

    Travel Photography Camera Gear

    All My Camera Gear

    What Travel Cameras Do I Use?

    I actually travel with 4-5 different cameras on my adventures around the world. This is a bit overkill for most people.

    However travel photography is how I make my living, so I invest in gear to help me accomplish my job. When I first started 7 years ago, all I used was a Canon 7D and a GoPro Hero.

    The camera backpack I use is called a LowePro Whistler 350. It's got room for a 15″ laptop, jacket, and incredibly fits all 5 travel cameras, lenses & some accessories if I need it to — great as an airplane carry-on.

    Travel Photography Tips

    I want to let you in on a little travel photography secret. Even if you have a top-of-the-line $10,000 camera, your photos aren't going to be spectacular if you don't know how to use it.

    And I don't mean pressing the shutter — I mean:

  • Learning how to shoot in manual mode
  • How to expose images properly
  • Adjusting your white balance
  • Framing shots for maximum impact
  • Paying attention to light
  • Post-processing your images with software
  • You don't become a good photographer because you have a nice camera, your photography improves over time through practice, patience, and skills you learn from others.

    So sure, invest in a new travel camera if you think you need it, but remember to invest money & time into learning new photography skills if you really want to create those jealousy-inducing images for your Instagram feed!

    Here are some of my favorite beginner travel photography tips.

    Travel Camera Giveaway

    Who Wants to Win a GoPro?

    Free GoPro Session Giveaway!

    If you don't have a GoPro action camera yet, but want one, here's your chance to win a GoPro to use on your next travel adventure!

    I'm giving one lucky reader their very own GoPro Hero Session 5 (along with some accessories).

    I love my GoPro, and travel with it everywhere. It's great for capturing water sports, hiking trips, epic selfies, and hands-free video from my travel adventures around the world.

    I've been traveling with a GoPro of some kind for the last 7 years!

    Here's an article I wrote about my favorite GoPro accessories for travel, along with examples of how you can use it to capture amazing footage.

    OFFICIAL RULES

    ELIGIBILITY: Ages 18+Promotion is open and offered to residents of any country. However the winner will be responsible for their own country's customs fees.

    CHOOSING A WINNER:A winner will be selected at random from the list of entries, and notified by email on December 3rd. If the winner does not respond within one week, an alternate winner will be chosen at random.

    PRIZE:The winner will receive (1) GoPro Hero Session, (1) GoPro Backpack, and (1) GoPro Selfie Stick. Prize value worth $450. Prizes are shipped to winner's chosen address. Local customs fees are not included in the prize.

    TERMS & CONDITIONS: Click Here For Details

    How To Enter Contest

    Enter your name and email address below and follow the instructions.

    You'll have the option to earn extra contest entries (and more chances to win!) by completing certain tasks.

    Good luck, and I look forward to congratulating the winner! ★

    Pin This!

    How To Choose The Best Travel Camera. More at ExpertVagabond.com

    Have any questions about travel cameras? What about other suggestions? Drop me a message in the comments below!

    Disclosure: Some of the links in this post are "affiliate links." This means if you click on the link and purchase the item, I will receive an affiliate commission. Regardless, I only recommend products or services I use personally and believe will add value to my readers.


    Source: How To Choose The Best Travel Camera (Plus Win A Free GoPro!)

    Monday, November 27, 2017

    Ninja Camera Editor V2.1. Apk Download [Free]

    Descriptions

    Worst app ever seen. So many annoying ads. showing up and fearures are really waste of time. Don't waste your time. Here we provide Ninja Camera Editor V 2.1. for Android 4.0++ This is Ninja Camera EditorMake yourself like a ninja to add ninja effects on your photomake friends amazed with your ninja photo,Similar as Ninja legend that has great strengthapp real ninja game is packed with realistic ninja cosplay

    Intruction :★ Open image from gallery★ Choose your favourite ninja mask, sharingan eye,ninja weapon,cosplay hairstyle,rasengan and much more★ Drag it to your photo★ You can resize and rotate it with multi touch★ Preview your anime cosplay with click next button★ Share your photo to your friends

    Features :★ All ninja effects are in high quality (HD) picture, make your ninja photo look real and nice★ Upload photo from photo gallery★ Save your photo to your Device★ Share your cool photo on Facebok, IG, or other sosmed

    Have much fun and enjoy ninja camera editor! Thank you in advance for your good reviewsif there is any problem please let us know. Write your problem in comment box below.

    Editors Notes:

    I dont suggest this app if you dont know how to opperate it, (this is easy to mess up),and might consider a 3 stars if and when this issue is fixed.

    Similar Apps APK مصمم الصور الا... فوتوشوبر &#821... فلاتر سناب تاج... تصميم وتظبيط و... تاثيرات السناب... برنامج الكتابة...
    Source: Ninja Camera Editor V2.1. Apk Download [Free]

    Saturday, November 25, 2017

    Paranoid Android Releases Snapdragon Camera App Sources

    It's been a few months since Paranoid Android got back in form. Today, it has added a modified Snapdragon Camera application featuring a new UI. When we say "modified", it means that the Snapdragon Camera app on Paranoid Android serves the same purpose with little alterations in the UI.

    Paranoid Android users have been requesting the makers for releasing their camera processing sources. Adhering to all the requests, developers of Paranoid Android finally uploaded their camera sources on GitHub. It's worth noting that this is an open source camera app only and not camera processing. On OnePlus 3 and OnePlus 3T, Paranoid Android's camera processing software worked wonders, which lead other users requesting for camera processing sources.

    The camera UI on Paranoid Android is pretty good and vivid in its own ways. There are a variety of options that the ROM has retained on Snapdragon camera app. However, those options have been shifted to the menu option placed in the top left corner. These options include face detection, manual ISO, continuous shooting mode, red-eye reduction, exposure, and white balance.

    For those who don't know, the Snapdragon camera app has been designed to utilise Qualcomm hardware in your Android device. So, any device with Snapdragon SoC can modify the app as per their requirements and use it on their device. The camera capabilities of Snapdragon SoC make many ROM developers include Snapdragon Camera app. It offers more open source feel to the ROM without the need to use other camera apps.

    So, if you would like to make complete use of Snapdragon SoC camera capabilities on your device, you can go ahead and download the sources of Snapdragon camera app by Paranoid Android. Here is the official GitHub link.

    After downloading and using it, please let us know about the performance on your custom ROM. Share your experience with is in the comments section below.

    Source: XDA-Developers

    Share Submit


    Source: Paranoid Android Releases Snapdragon Camera App Sources

    Friday, November 24, 2017

    Dromida Kodo FPV Camera Drone review

    The Dromida Kodo FPV Camera Drone is a fun, easy-to-set-up, beginner drone with some great extra features. Unfortunately, because of a poorly designed app and subpar hardware, it is not a true First Person View (FPV) drone. At $89.99, it's still a good deal though for a drone that can (barely) stream Wi-Fi video and take pictures on command.

    The Kodo FPV Drone comes in a standard flip top box adorned with pictures making promises the little drone definitely cannot keep.

  • Dromida Kodo FPV Camera Drone
  • FPV Goggles/Smartphone holder
  • LiPo Battery
  • USB LiPo Charger
  • Replacement Props
  • AAA Batteries (4)
  • Screwdriver
  • The box the Kodo ships in has compartments for the drone and a built-in handle which makes it pretty useful for storing and transporting the drone and its accessories.

    The Kodo FPV Drone comes with a 2.4GHz radio controller with AA batteries, FPV Goggles, a LiPo battery with USB charger, replacement props and a tiny screwdriver for accessing the battery compartment on the controller.

    The design of the Kodo FPV is very similar to other entry-level drones. One thing I like in particular are the built-in prop protectors.

    Like most drones, the props are color-coded for front and back. The Kodo has a small Wi-Fi camera on its nose and the angle of the camera can be manually adjusted before flight.

    The included Lithium polymer battery hangs under the body of the drone and connects via power cables to the rear.

    In my tests, I was able to fly indoors for just under five minutes per full charge. During that time I streamed video via Wi-Fi and captured both stills and video files with the drone's camera.

    Because of its light weight and small battery, the Kodo FPV is primarily an indoor drone. It can be flown outside, but fighting even the slightest breeze will quickly have you losing control and the battery will drain that much faster.

    The controller for the Kodo is larger than what usually comes with a drone this size, which is great because larger controllers and control sticks make any drone much easier to fly, especially for novices.

    The controller has a spring-loaded smartphone holder which can fit just about any standard phone. Once connected to the drone via Wi-Fi, you can monitor the view from the drone's camera via your phone.

    The controller has dedicated buttons for taking pictures and recording video, as well as a "stunt" button which initiates a flip when the drone is in flight. Like most drones, the Kodo and its controller have a "Power-On Fail-Safe". This prevents the drone propellers from starting up until the flight stick is moved to the up and down position.

    The included USB charger allows you to charge the drone's LiPo battery via any powered USB port or by connecting it to a USB power plug. In my tests it took about 35-40 minutes for the battery to fully charge.

    Read this:

    Eachine E55 Mini WiFi FPV Foldable Pocket Drone review

    The same cable that connects the battery to the drone fits into a port on the charger. A great feature of this particular charger is that it has a red LED which flashes during the charging cycle and then glows steady red when charging is complete.

    Also included with the Dromida Kodo is a complete set of replacement props. For novices and pros alike, it only takes a few crash landings to see how valuable these replacements will prove to be.

    The main sell of the Dromida Kodo FPV Drone is the "FPV" aspect of it. The goggles that are included with the Kodo are meant to hold your smartphone and allow you to fly the drone in First Person View.

    The goggles are very similar to any number of "Virtual Reality" googles that are sold on the web which allow you to access Google Cardboard or similar Virtual Reality apps and games.

    The goggles themselves are comfortable and will fit most smartphones. They're not too heavy when worn for long periods of time and are adjustable for kids and adults.

    A sliding bracket on the right of the goggles allows a user to place their compatible smartphone in the unit and once closed, view the app content through the googles.

    The app and its functionality, as usual, are the biggest disappointments of the Dromida Kodo Drone. The Kodoview app can be downloaded and installed on your device, via the QR code in the manual or by searching the Google Play Store or Apple App Store.

    Once installed and running, you'll need to power on the drone and controller and then find the drone's Wi-Fi signal. After choosing the correct Wi-Fi signal you SHOULD be able to access the camera view from the drone by clicking on FLY in the app.

    Unfortunately, that doesn't always happen at first. It took me several tries and a good fifteen frustrating minutes when, for some unknown reason, the camera finally started streaming to my device, a Google Pixel. The quality of the camera is very low, both for the videos and stills. What's interesting about the Kodo, that I haven't seen on other camera drones is that the media files are not stored on the drone at all. Usually, a camera drone will have an internal SD card and the camera will write to it when accessed.

    Instead, the Kodo transmits and stores all content on to the attached smartphone. I like this better than an SD card mainly because it makes it a lot easier to access your media. The Kodoview app creates a folder on your device where it stores all the media captured by the Kodo Drone and through the app you can view, select, and delete any of the pictures or videos.

    Read this:

    AirSelfie is a pocket-sized drone designed to take your picture from the air

    There's an option in the Kodoview app which allows you to view the First Person View of the camera and utilize the included FPV goggles.

    In my tests though, as you can see in the video and pictures captured from the Kodo, the quality of the video is very low and the lag of the transmission is much too high to be able to fly via the FPV goggles alone.

    There is a lot of artifacting and it's incredibly difficult to navigate with such poor laggy feedback.

    The good news is that the googles and FPV are good for something. It's great fun for someone else to view the First Person View while you're flying.

    Even though the Dromida Kodo FPV Camera Drone doesn't quite deliver on the promise of a true First Person View experience, it is a good value at the price of $89.99 and great fun for drone novices.

    It's easy to get from box-opening to flight time and the battery life and performance are on par with other drones in this price range. The added features like FPV don't work like they should, but do allow for some alternative enjoyment.

    Source: The sample for this review was provided by Dromida. Please visit their site for more info and Amazon to order.

    If you liked this story, be sure to read our other stories:

    Product Information Price: $89.99 Manufacturer: Dromida Retailer: Amazon Requirements:
  • Android or Apple smart device compatible with KODOVIEW mobile app
  • USB Power Source (such as PC with USB port) or a USB AC Adapter
  • Pros:
  • Good price for a Wifi enabled live-view drone
  • Durable construction
  • Easy setup for drone flight without app or FPV mode
  • Cons:
  • Cannot be flown in First Person View
  • Poorly designed App doesn't always connect with Drone
  • Poor video and picture quality

  • Source: Dromida Kodo FPV Camera Drone review

    Thursday, November 23, 2017

    How this Google Glass app is providing digital assistance to my blind aunt

    Wendy Poth, my aunt, lost her sight when she was 7. She's now completely blind, so she doesn't see shadows, faces or even the darkness when she closes her eyes.

    Wendy, who's now in her 60s, has lived an independent life as a therapist and trained social worker. These days, she's a die-hard technology enthusiast and is rarely seen at home without her Apple Watch Series 3, Amazon Echo and iPhone, which she uses to get news updates, call friends and track her daily activity.

    So I wasn't surprised to learn that Wendy signed up to be among the first to try out a new product for the blind and partially sighted called Aira.

    Here's how it works:

    Wendy puts on a pair of Google Glass, picks up her iPhone and uses Siri to place a call to Aira's network of "agents." As we strolled through Kansas City's downtown plaza, she asked her designated agent -- Wendell was his name -- how to navigate to a coffee shop and read the menu.


    Source: How this Google Glass app is providing digital assistance to my blind aunt

    Wednesday, November 22, 2017

    When Detecting Pancreatic Cancer, App Takes No Jaundiced Eye

    A lot has been said about the narcissism of the selfie-taking generation, but it does have an upside. Researchers at the University of Washington have developed an app that can diagnose pancreatic cancer just by taking a selfie. According to DigitalTrends.com, the mobile app can screen for one of the deadliest forms of cancer in a non-invasive way. The app uses a smartphone camera, computer vision algorithms, and machine-learning tools to detect jaundice. In an initial clinical study of 70 people, the app correctly identified cases of concern 89.7% of the time. Wochit


    Source: When Detecting Pancreatic Cancer, App Takes No Jaundiced Eye

    Tuesday, November 21, 2017

    Leica Expands Camera Lineup With Vintage CL

    Leica Camera AG today announced an expansion to its APS-C camera lineup with the classic-looking CL mirrorless camera. The CL is the second Leica camera manufactured in Germany and, while the CL and TL2 models are technologically similar, the CL eschews the TL2's sleek, high-tech form factor for a more traditional Leica design. The black version of the CL will hit stores at the end of November.

    The CL boasts Leica's first electronic viewfinder with what the company calls EyeRes technology, designed specifically for the CL. The EyeRes viewfinder virtually eliminates image latency, and offers a resolution of 2.36 million pixels for sharp, vivid viewing. One of the chief advantages of this technology is that the final image is viewable in the viewfinder, offering photographers full control over their compositions.

    The CL's 24-megapixel APS-C sensor also captures video at a resolution up to 4K at 30 frames per second. A Maestro Series II processor and fast autofocus with 49 metering points help ensure photographers achieve sharp focus quickly and accurately. 

    The camera's built-in Wi-Fi capability is a powerful tool that allows users to quickly share images to social media via the CL App for iOS or Android smartphones. It also gives photographers incredible freedom with the ability to use their phone as an off-camera viewfinder or remote.

    The CL's compact form and iconic Leica design make it a discreet camera perfect for street photography or as a lightweight companion when a bulky DSLR may not be ideal.

    The camera's main functions are all accessible on the top plate, including two dials for setting the aperture, shutter speed, ISO value, and exposure compensation. The top plate display shows users all relevant settings.

    All lenses developed for the TL and SL systems, with focal lengths ranging from 17mm to 200mm, are available to the CL by using the bayonet mount, eliminating the need for an adapter. TL lenses are developed in Germany and Leica boasts exceptional imaging through the use of precision engineering and the finest lens materials. 

    Among the lenses available are three zooms: the Super-Vario- Elmar-TL 1:3.5–4.5/11–23 ASPH, Vario-Elmar-TL 1:3.5–5.6/18–56 ASPH, and the APO- Vario-Elmar-TL 1:3.5–4.5/55–135 ASPH, and four prime lenses: the Elmarit-TL 1:2.8/18 ASPH., Summicron-TL 1:2/23 ASPH, Summilux-TL 1:1.4/35 ASPH, and the APO- Macro-Elmarit-TL 1:2.8/60 ASPH. 

    Leica M- and R-Lenses can be used on the CL with an adapter. 

    [via Leica]


    Source: Leica Expands Camera Lineup With Vintage CL

    Monday, November 20, 2017

    Google Explains Decisions Made for Pixel 2 Camera: High ISO in Videos, 4K/60FPS, RAW and Manual Modes, and More

    The Google Pixel 2 and the Pixel 2 XL may have faced their share of issues, but one thing which has not been a source of issue is their cameras. Their 12MP camera with fused video stabilization has been acclaimed by many to be currently the best smartphone camera, with excellent image and video quality. However, that doesn't mean that the Pixel 2's camera is perfect, as many features such as Pixel Visual Core are yet to roll-out; they will be enabled in future software updates.

    To clarify some of the issues and doubts they had with the Pixel 2's camera, NDTV Gadgets had a Hangout session with Brian Rakaowski, VP of Product Management at Google and Timothy Knight, who leads camera development for Pixel 2.

    The first issue faced by NDTV Gadgets was that the Pixel 2's 4K low light video is noisy. Mr. Knight from Google explained that this is intentional as the Pixel 2 tries to brighten up the scene as much as possible by using a higher ISO. This has the effect of having a brighter video, at the cost of an increased amount of noise.

    That is a tradeoff we think a lot about. We tried to strike a balance of the two. If you compared the Pixel 2 camera to other mobile cameras, you'll see that we're brighter. It's easy to make the noise go away if you just make the image dark. We decided that we rather let the user see the scene more clearly, by making it brighter, even if that means there is some more noise.

    He added that 1080p video from the Pixel 2 should be a bit less noisy compared to 4K. This is because there's more headroom to do heavy weight processing in 1080p as compared to 4K.

    Another related issue is that the Pixel 2 can't record 4K video at 60FPS. The iPhone 8 / 8 Plus and the iPhone X do have 4K-60fps capability thanks to the A11 SoC. Mr. Knight stated: "4K at 60[FPS], unfortunately, is not something we're going to bring to Pixel 2. For future products, we'll consider it certainly. But for Pixel 2, 4K30 and 1080 60 is the video we plan to support." The statement implies that the next Pixel phone may have 4K60 support. The limitation for the Pixel 2 is because of the Qualcomm Snapdragon 835 SoC, which does not support recording 4K video at 60FPS.

    Moving on, enabling manual control for HDR+ in the settings of the Pixel 2's camera app gives users a second option in the camera preview: 'HDR+ enhanced'. This was known as 'HDR+ on' in the first-generation Pixel. NDTV Gadgets 360 stated that when they tested the Pixel 2 and the Pixel 2 XL, they didn't notice any quality difference between the two modes, other than the fact that it takes longer to process the HDR+ enhanced photo.

    Mr. Knight's response was to state that there is no difference in quality in the large majority of cases. HDR+ and HDR+ enhanced will "take the same photo from a user perspective". He noted that in a small number of conditions, HDR+ enhanced can take a photo that has slightly more dynamic range. The reason that HDR+ enhanced mode longer to process is because in standard HDR+, Zero Shutter Lag (ZSL) is on. On the other hand, it's disabled in HDR+ enhanced. As ZSL results in photos taken with almost no delay, this means that HDR+ enhanced is naturally going to be at a disadvantage here.

    NDTV Gadgets 360 assumed that the Pixel Visual Core imaging chip would help speed up the process of 'HDR+ enhanced' photos, but Mr. Rakaowski confirmed that this would not be the case, even when the chip would be enabled in Android 8.1. The Pixel Visual Core's primary purpose will be to enable third-party camera apps to use the HDR+ feature through the camera API. (In Android 8.1 DP1, developers still can't test HDR+ through the Visual Core; it is said to be enabled in the next developer preview).

    Finally, Google also explained the rationale for the lack of manual controls and RAW file supports. Other Android manufacturers have included manual controls through the years, with sliders for ISO, shutter speed, focus distance, exposure compensation, and more. Most users do not need manual controls, but the choice to have the option is good.

    Mr. Knight stated that simply putting sliders for ISO, exposure, and so on is not the best interface for a phone. He added that if Google added a manual mode, users who used it would not be able to take advantage of HDR+, which is the set of techniques used by Google to get excellent image quality from its smartphone cameras. Therefore, the image quality would deteriorate.

    Mr. Knight said that Google may add some level of manual control in the future,  but people "[shouldn't] expect to see a manual slider anytime soon". Google is relying heavily on its machine learning and computational photography, and therefore the company isn't willing to have a manual mode in its camera app, which would defeat the purpose of auto HDR+.

    The same is applicable for the ability to shoot in RAW in Google Camera itself. Mr. Knight stated that the company has received similar feedback about the ability to shoot in RAW from other users as well. He concluded by stating that they didn't have any updates as of now, but the company was looking into it.

    Overall, the report was illuminating as we got to understand several decisions and tradeoffs which Google made with the Pixel 2's camera. Ultimately, the decisions taken don't make the Pixel 2's camera sub-standard, but they do help prove that there is a still a long way to go in terms of improvement for smartphone cameras.

    Source: NDTV Gadgets

    Want more posts like this delivered to your inbox? Enter your email to be subscribed to our newsletter.


    Source: Google Explains Decisions Made for Pixel 2 Camera: High ISO in Videos, 4K/60FPS, RAW and Manual Modes, and More

    Sunday, November 19, 2017

    Five useful App Pairs for your Galaxy Note 8

    Galaxy Note owners have long been able to take advantage of the phablet's large screen real estate to open two apps side-by-side. Samsung made the process of launching two apps simultaneously easier with the Galaxy Note 8. The new flagship has a feature called App Pair. Users can easily create pairings that will always launch two apps side-by-side with just one tap.

    We've made a list of five useful App Pairs for the Galaxy Note 8. This list is by no means exhaustive, and you can create your own pairings to get the most out of the feature. Before we talk about our suggestions, let's take a look at how you can create App Pairs on the Galaxy Note 8.

    How to create an App Pair on Galaxy Note 8

    Before you can take advantage of this feature, you need to know how to create an App Pair. Follow the steps below.

    Step 1: Open the Apps Edge panel on any screen by swiping the Edge panel to the left (or to the right if you have the Edge panel located on the left of the display).

    Step 2: Tap the + sign on one of the empty slots. If all slots are already assigned to shortcuts, you can press and hold one of the existing shortcuts and delete it.

    Step 3: Now, hit the Create App Pair option at the top right of the screen.

    Step 4: Select two apps from the list (you only need to tap once on each app). The first app will appear at the top and the second at the bottom when these apps are opened in split-screen view.

    Step 5: Tap on Done to save the app pair. Repeat the above steps to add more app pairs.

    Five useful App Pairs for the Galaxy Note 8

    The pairings that have been created can be accessed by opening the Edge panel and going to the Apps Edge screen. Now, let's take a look at five App Pairs that we think would be handy.

    Camera + Gallery

    This is a no-brainer. This app pair will launch the Camera and Gallery apps side-by-side, enabling you to capture and manage your photos simultaneously. It makes life easier as you don't have to deal with minimizing and relaunching apps.

    Waze + Spotify

    For those of you who like to stream music in the car, this pairing enables you to keep an eye on traffic information with Waze while streaming your favorite tunes from the world's most popular music streaming service. Waze can also be replaced with Google Maps, while Spotify can be replaced by your favorite music streaming app.

    Message + WhatsApp

    Have to juggle between text messages and WhatsApp? This pairing will prevent you from going crazy because you won't have to switch back and forth between these apps. Also works with any other instant messaging app.

    Phone + Email

    This is a great pairing for those who really like to be productive on the move. You won't have to worry about catching up on emails no matter how long the phone call goes on. We just don't mean the standard email app here – you can also use Gmail or any other email client.

    Google Translate + Google Maps

    Find yourself lost in a new city? Use this app pairing to find your way back and even ask for help from the locals along the way.

    What are some of your favorite App Pairs on Galaxy Note 8? Do share with us in the comments below.


    Source: Five useful App Pairs for your Galaxy Note 8

    Saturday, November 18, 2017

    Essential Phone’s Camera App Updated with 60FPS Monochrome Video Support

    The Essential Phone has been a device plagued with problems since its release, and one of its largest criticisms above all else has been its camera. The phone delivered a poor camera experience ranging from the camera stability to the actual quality of the photos it takes, and these issues were simply unacceptable at the original price of the phone. Thankfully, it was discovered that using the Google Camera HDR+ Port actually resolves a lot of the camera issues that users of the device had.

    Essential, to their credit, have been working on improving their camera. This has come in the form of many stability and quality centred updates for their camera application through the Play Store, where more credit is due for modularising the camera and being able to upgrade the camera quality without upgrading the whole system. This is the standard method of upgrading system applications outside of OTAs usually, but sometimes camera processing software may be stored separately from the actual camera application.

    The latest update brings a number of changes, with the changelog below.

  • Mono video recording now supports 60 FPS
  • Improved OTA flow for 360 Camera updates
  • Minor UI improvements
  • Stability fixes
  • The update is said to fix a number of crashes across the camera and gallery applications, and also adds monochrome video in 60FPS. This will allow for you to take black and white video in 60FPS natively using just the monochromatic camera sensor, rather than applying processing to the full-colour sensor. There are also some small UI and icon changes.

    While still not able to reach levels that it should be able to achieve, the camera has greatly improved since launch and each update pushes it closer to its real potential. If you have the Essential phone, check out the camera application on the Google Play Store down below to see if you've updated yet.

    Want more posts like this delivered to your inbox? Enter your email to be subscribed to our newsletter.


    Source: Essential Phone's Camera App Updated with 60FPS Monochrome Video Support

    Friday, November 17, 2017

    Essential Phone Camera update (version 83) brings Mono video recording at 60FPS, UI improvements and more

    An update to Essential Phone's Camera app is one of the most anticipated among Essential Phone users as there is a room for lot of improvement. The Essential Team itself has been very vocal about it and actively discusses with users about the issues present in their Camera app, along with promises to improve the app with regular updates.

    The latest update to Essential Phone Camera app comes with version 0.1.083, and it brings with it a few new features such as Mono video recording at 60FPS, improved OTA flow for 360 Camera updates, Minor UI improvements and stability fixes. Like always, the update is available to download through Play Store.

    While these new features and changes in the Camera app update are welcoming, one thing that most users want is uncompressed pictures, and it still hasn't been delivered even when a member of Essential Team confirmed that version 83 (today's release) will feature decreased compression for images taken with Essential Phone Camera app. Check out his full statement below:

    For file size we have decreased compression in our internal builds and are currently testing. This will increase the file size of the images. We should be able to release in our followup to camera version 83 (releasing very soon).

    In case you aren't aware, the pictures taken with Essential Phone camera app are compressed to only about 1.5MB in size, while other smartphones take images of at-least 4MB in size for the same resolution.

    That said, Essential team is also working on bringing Portrait mode to their Camera app which will help take amazing portrait pictures with nice background blur. The team has plans to release Portrait mode before the Holiday's (by year end).


    Source: Essential Phone Camera update (version 83) brings Mono video recording at 60FPS, UI improvements and more

    Thursday, November 16, 2017

    Essential Phone’s Camera App Updated with 60FPS Monochrome Video Support

    The Essential Phone has been a device plagued with problems since its release, and one of its largest criticisms above all else has been its camera. The phone delivered a poor camera experience ranging from the camera stability to the actual quality of the photos it takes, and these issues were simply unacceptable at the original price of the phone. Thankfully, it was discovered that using the Google Camera HDR+ Port actually resolves a lot of the camera issues that users of the device had.

    Essential, to their credit, have been working on improving their camera. This has come in the form of many stability and quality centred updates for their camera application through the Play Store, where more credit is due for modularising the camera and being able to upgrade the camera quality without upgrading the whole system. This is the standard method of upgrading system applications outside of OTAs usually, but sometimes camera processing software may be stored separately from the actual camera application.

    The latest update brings a number of changes, with the changelog below.

  • Mono video recording now supports 60 FPS
  • Improved OTA flow for 360 Camera updates
  • Minor UI improvements
  • Stability fixes
  • The update is said to fix a number of crashes across the camera and gallery applications, and also adds monochrome video in 60FPS. This will allow for you to take black and white video in 60FPS natively using just the monochromatic camera sensor, rather than applying processing to the full-colour sensor. There are also some small UI and icon changes.

    While still not able to reach levels that it should be able to achieve, the camera has greatly improved since launch and each update pushes it closer to its real potential. If you have the Essential phone, check out the camera application on the Google Play Store down below to see if you've updated yet.

    Want more posts like this delivered to your inbox? Enter your email to be subscribed to our newsletter.


    Source: Essential Phone's Camera App Updated with 60FPS Monochrome Video Support

    Wednesday, November 15, 2017

    How Does an iPhone X App Reveal DSLR-Like Photo Powers? We Asked Its Maker

    A new app that reveals the hidden potential of the iPhone X is causing a storm. Focos, a free app released last week, takes the information from the two camera lenses and uses it to recreate the level of quality normally found on high-end DSLR cameras.

    "All users believe that Focos is more useful and professional than the stock Camera app," Patrick Wang, developer of the app, tells Inverse.

    The built-in camera app normally uses the information from the two lenses to judge distance and blur the background of subjects, in a feature called Portrait Mode. Focos takes this to a new level by allowing users to move the focus after the picture has been taken, as well as edits to the "bokeh" blur effect itself. Instead of carrying a bag full of equipment around, Focos enables users to take impressive pictures using the smartphone in their pocket.

    Focos in action.

    Focos in action.

    Focos in action.

    The app, which also runs on the iPhone 7 Plus and 8 Plus' dual camera setups, also allows for a 3D visualization of the depth information captured by the sensors. Gurnam Bedi, co-founder of developer Primoko, shared a video of the app in action with his 7,000 followers on Tuesday.

    The demonstration was quickly passed around the Apple development community, with several followers commenting on the app's surprising abilities.

    "This is so freaking cool," said Twitter user Marius Gardelli.

    Wang was able to make the app thanks to a new application programming interface unveiled at the annual Worldwide Developers' Conference in June. Wang started work right away, but he noticed that the speed of image processing with the app is rather slow.

    "I think that's why Apple didn't do the same thing like I did," Wang says. "They like the faster system and camera experience."

    Apple has left it up to developers to come up with experimental ways to use the camera, but it's also rolled out some ideas of its own. Portrait Lighting, a new feature found on the 8 Plus and X that launched this year, uses the depth information to change the lighting effects around subjects. Apple is also using the front-facing face scanning system found on the iPhone X to enable these same effects for selfies.

    The iPhone 8 Plus.

    The iPhone 8 Plus.

    The iPhone 8 Plus.

    The iPhone is not the only phone to try and recreate these effects. The OnePlus 5 and Samsung Galaxy Note 8 also employ dual cameras for new effects. The Google Pixel 2 offers the same background blurring, but its single lens design means it has less data to work with than the other devices.

    It's an exciting moment in smartphone photography, but Wang is already thinking about what comes next. In the future, he plans to add more aperture options, with the end goal of making the camera seem more like a traditional lens.

    "I'll make new crazy features in the future updates," he said.


    Source: How Does an iPhone X App Reveal DSLR-Like Photo Powers? We Asked Its Maker